Features of the Sun
Although I have loved astronomy my entire life, I only got seriously interested in solar observing around 2010/2011. I had always thought that solar astronomy wasn’t “proper astronomy” and that it was dull and boring. I was so very wrong! The Sun is always changing; with the correct equipment we can observe sunspots moving across the surface each day, and with a specialist solar telescope we can see what is happening within the Sun’s outer atmosphere; a region of the Sun which is extremely dynamic. The Sun is our nearest star. After the Sun, our nearest star is Proxima Centauri which is 4.2 light years away, but most stars are much further away than this, so with those huge distances, our observations are restricted. This means that studying the Sun is really important because observations of its behaviour can give us an insight into what is happening within other, more distant stars. There are increasing numbers of people observing and imaging the Sun with a variety of specially adapted equipment. It can be a daunting area of astronomy due to the safety issues involved. I have also at times seen some confusion about which solar features can be seen with which equipment. This article will summarise the main features of the Sun and how you can safely observe them. At the end I will share some of tips which can help you to get started with solar astrophotography.
The Sun is a huge nuclear reactor. It is approximately 1,400,000km in diameter (that is 100 times the diameter of Earth) and by fusing hydrogen into helium, it kicks out 3.84 x 1026 watts of energy per second. To put that figure into perspective, it would take 1.5 x 10¹⁷ power stations to match that output! The first time you see the Sun through eclipse glasses or through a solar filter, it looks like it has a solid surface. However, it is not solid; it is a huge sphere of gas which is split into several layers. At the centre is the core, where all the nuclear fusion reactions take place. It is extremely hot in the core; estimates put the core temperature at around 15,000,000 Kelvin (to convert Kelvin into Celsius you just subtract 273, so that puts the core temperature at around 15 million degrees C!). Next are the radiative and convective zones, which are involved with transferring the energy from the nuclear reactions to the outer layers. The closest thing the Sun has to a surface is the photosphere. This is the layer you see when you observe the Sun in visible or white light; I will use the term surface when referring to the photosphere, but the "surface" you are seeing is actually a gaseous shell. Above the photosphere, the Sun has an atmosphere and this is made up of 2 layers; the chromosphere and the corona.
The Photosphere
The photosphere is 500km thick and is where most of the Sun's light originates. This sounds like a very thick layer, but when you consider the diameter of the Sun, it is comparatively very thin. As a result of all the light it emits, it is very hot. The temperature ranges from around 9000 - 4500K but it averages at around 5800K. It has a very low density though, probably around 1000 times less dense than the air we breathe on Earth. Because there is so much light originating from the photosphere, it is necessary to use a filter to block out most of this light in order to study surface features. When you look at photos of the photosphere, the first obvious features you notice are limb darkening and sunspots. More of a challenge is surface granulation.
This is a phenomenon which causes the outer edge of the Sun’s disc, or limb, to appear darker than the rest. This is particularly apparent on photographs but it is not an artefact. To understand this, you need to picture the spherical nature of the Sun surrounded by the gaseous shell of the photosphere. Because the photosphere is not solid, you are actually looking into it rather than just at it. The density of the photosphere increases with depth, so there is a limit to how far into it you can see. When you get towards the edges you can see further into it than you can in the middle. So why does it appear darker? In addition to the density increasing, the temperature also increases with depth. In the centre of the disc this means you are able to see into a region which is hotter, therefore brighter. At the edges, because of the geometry of the sphere, even though you are able to see deeper in terms of distance, you are only able to see into the cooler part of the photosphere, so it appears darker. This diagram should help to explain this a little better, although the layers are not to scale.
Limb darkening graphic by Mary McIntyre

Sunspots
Sunspots appear as darker regions within the photosphere - they are darker because they are cooler than the surrounding area. Typically, the centre of a sunspot is around 4200K, about 1600K cooler than the rest of the photosphere. They are a transient phenomenon, usually lasting a couple of weeks. Because they last that long, it is possible to measure the rotational period of the Sun by tracking the movement of Sunspots across the surface, and this is exactly how early solar astronomers calculated the Sun’s rotational period and discovered that the Sun exhibits differential rotation. At the equator the Sun takes just under 26 days to complete one rotation, however, at the poles it takes 36 days. Sunspots vary greatly in size. While they may look small in comparison to the diameter of the Sun, each Sunspot is usually easily larger than the diameter of the Earth. The exceptionally large ones can measure a huge 200,000km! They are caused by localised changes in the magnetic field, which causes disruption in the convection currents in the regions beneath the photosphere, which in turn means that heat cannot rise properly. This causes localized decreases in temperature and these regions appear darker than the surrounding area. Sunspots are usually made up of two parts, the centre or umbra, and outer area called the penumbra as seen in the image below. The penumbra is slightly warmer than the umbra therefore does not appear to be as dark. Sunspots are associated with the Sun’s very complex magnetic field. If you overlay a magnetogram of the Sun over the top of the active regions, it looks very similar to the pattern iron filings make when laid over the top of a bar magnet and sunspots have regions of opposing magnetic charge.
Sunspots often appear in groups and as they rotate into view on the Earth-facing side they are assigned a number which begins with the initials AR which stands for “active region”. Even if a sunspot group lasts long enough that it disappears around the back of the Sun and then reappears again a couple of weeks later, it is still assigned a brand new AR number as it rotates back into Earth view. Sunspots are a direct indicator of solar activity and are associated with solar flares. During periods of increased activity there are more sunspots, while during periods of low activity there are fewer, sometimes none at all. The tendency towards higher and lower sunspot number follows a periodic cycle which is known as the solar cycle, and following many years of data collection it has been ascertained that in terms of sunspot numbers, the cycle is approximately 11 years long. However, from a magnetic point of view the true length of the sunspot cycle is 22 years because at the end of each 11 year cycle the dipole undergoes a polarity reversal.
Sunspot group, showing the central umbra and surrounding penumbra
Photo by Pete Williamson

If you look closely at the above image, you will see that it is made up of a complex pattern of granules. Each granule looks a bit like a bright cell. They are ever-changing, typically only lasting about 5 to 10 minutes. Each granule is the top of rising convection column of hot material which comes from deeper within the sun. As the hot material rises up and reaches the top of the column, it begins to spread out horizontally and then starts to cool and sink back down again. This forms the darker channels which can be made out between the brighter granules. Although they look small, each granule measures about 1000km across. They are a challenge to observe from Earth because our atmosphere causes interference, but granulation is easier to spot on images and makes a really interesting timelapse subject.
Faculae
Around the edges of white light images, you can see little bright channels snaking across the photosphere. They are called faculae and are formed by a strong concentration of magnetic field lines which form in the canyons between solar granules. You can see some faculae on the right hand side of the image below.
Sunspots and faculae by Mary McIntyre

The Sun’s Atmosphere
The light from the photosphere is so bright that it completely masks the small amount of light from the tenuous layers above. The only time when it is possible to view the Sun’s atmosphere with the naked eye is during a total solar eclipse. The Moon acts to block out the photospheric light and allows the bright halo of the Sun’s atmosphere to shine through. It is then you can see the thin, pinky coloured layer of the chromosphere, and the much more extensive pearly white corona. However, solar eclipses don’t occur that often and when they do, each eclipse is only visible from a small area of the world. The corona is only visible during the totality phase of an eclipse, so you can’t view it if the eclipse is an annular or a partial eclipse. We were lucky enough to be able to visit the USA for our honeymoon in 2017 to see the solar eclipse there. Seeing that corona during totality with the naked eye was an experience I will never forget! (There will a photo further down.) In the absence of a total eclipse, astronomers use something called a coronagraph in order to block out the photospheric light and therefore allow the study of the corona. In order to view the chromosphere from Earth, we need an alternative way of blocking out the light from the photosphere. One way of doing this is to restrict the wavelengths of light that are visible by using special filters. In order to understand how these filters work, it is necessary to understand the nature of light.
Light is just one part of the electromagnetic (EM) spectrum. At one far end of the EM spectrum we have gamma-rays with the shortest wavelength. Next come X-rays, then ultraviolet. Then we have visible light, which can be split into its component parts using a prism, or on a showery day you can see this at work in the form of a rainbow. At the shortest wavelength of the visible spectrum is violet light and the longest is red light. Beyond the visible range we have infra-red, followed by microwaves, and finally, with the longest wavelength of all, we have radio waves. Wavelengths are often measured in nanometres (nm); 1nm = 0.000000001 metres, but you will also see the frequency of waves measured in Hertz (the shorter the wavelength the higher the frequency) or Angstroms (1 Angstrom = 1 10 billionth of a meter). There are certain wavelengths at which the light from the chromosphere becomes more prominent than that of the photosphere. The two most commonly used are hydrogen-alpha (H-alpha), which restricts the view to light with a wavelength of 656.3nm, and calcium-K, which restricts it to 393.3nm. So why the names H-alpha and Calcium-K? It relates to the behaviour of atoms within the chromosphere. Hydrogen atoms are very efficient at absorbing and emitting radiation. In this situation, the hydrogen atoms absorb a lot of the 656.3nm radiation coming from the photosphere, but at the same time they have very prominent emissions of their own at that same wavelength. These emissions are responsible for the chromosphere being reddish in colour. Hydrogen also behaves this way at shorter wavelengths, so in addition to H-alpha you can use H-beta, H-gamma or H-delta filters. In a similar way, calcium atoms do the same thing but at a wavelength of 393.3nm for Calcium-K filters or 396.8nm for Calcium-H. Dedicated solar telescopes such as the range available from Lunt or Coronado will contain a specialist extremely specific hydrogen alpha filters. Another product on the market which allows you to view the Sun in these wavelengths is the Quark Chromosphere module. Please note – this equipment is extremely specialised and it is not the same as trying to use a hydrogen alpha filter designed for deep sky astrophotography so please NEVER try to view the Sun with one of those types of filter!
That’s the explanation of the filters out of the way, so let’s look at the features of the chromosphere.
Images taken in H-alpha and calcium-K look very different to those taken in white light because you are looking at a totally different part of the Sun. In white light, you are looking at surface features of the photosphere. At the restricted wavelengths used with H-alpha and calcium-K, you are looking directly into the chromosphere. It is not uniform like the photosphere beneath it and it has been described as “a layer of froth stirred up by the photosphere”. One of the most surprising features of the chromosphere is that it is hotter than the photosphere, with a temperature that ranges between 4,500 - 100,000 K.
Plages
In both H-alpha and Calcium-K, the most prominent feature is the presence of bright specks littered across the surface, some of which group together to form really bright patches called plages. These bright regions are located directly above the active regions of the photosphere and they are closely connected to the faculae. They are usually present over the top of or very close to a sunspot group. The images below show the Sun in white light and hydrogen alpha on the same day. In the first image you can see the large sunspot group on the lower right in white light and its associated plages in H-alpha. The second image is a close up view of an active region imaged in white light and H-alpha and once again you can see the plages in relation to the active regions.
The Sun in white light and H-alpha by Mary McIntyre


Plages can often appear more prominent at Calcium-K wavelengths, as shown in the image below.
Calcium-K image of the Sun, showing the bright plages (and aircraft photobomb!) -
Photo by Pete Williamson
Photo by Pete Williamson

Visible best at H-alpha wavelengths, these are in my opinion the most spectacular solar feature to see both visually and photographically. They are huge clouds of plasma which have been ejected from the solar surface and which are held up in arches by magnetic forces along the limb of the Sun. When viewed anywhere other than the limb, they appear as dark winding features called filaments. It is difficult to emphasize just how big these features are, but in the first image below, you can see a huge arching prominence with the Earth shown to scale.
Sun in H-alpha with large prominence – by Mary McIntyre

And in the next image we see the longest filament I’ve ever observed, which covered almost 2/3rd of the entire solar diameter; this filament was approximately 500,000km in length!
Sun in H-alpha with long filament – by Mary McIntyre

The final layer of the Sun’s atmosphere is the corona. As already mentioned, a solar eclipse allows us to see just how far reaching the corona is; it stretches millions of kilometres out into space. It has an extremely low density, and only produces about a millionth of the visible light than the photosphere does. This makes it all the more surprising that its temperature is an enormous 2,000,000K; compare this to the photosphere which has an average temperature of 5,800K. It is still a subject of debate as to exactly what mechanisms are in place to allow such a tenuous layer of gas to have such a higher temperature than the surface below. It is thought to be linked to the Sun’s magnetic field and magnetohydrodynamics (way beyond the scope of this article!). Due to the comparatively dim light being emitted from the corona, the only way to observe it outside of a total solar eclipse is to use a coronagraph. This is a specially adapted telescope which uses an opaque disc to block out the light from the photosphere. These are more difficult to build than they sound! The best images taken with a coronagraph are taken from space-based solar telescopes. The image below is my image of the corona taken during the 2017 solar eclipse.
Corona during Totality of the USA 2017 solar eclipse by Mary McIntyre

The first thing to point out is an obvious one, but of vital importance. You must NEVER observe the Sun without an appropriate filter in place (unless you are using a projection method and even then do so with care). Observing without the correct equipment puts you at risk of permanently damaging your eyes, possibly even causing blindness. As you can see in the image below, even the tiny finder scope on the top of your telescope is powerful enough to burn a hole through an end cap, so it can do the same to your eyes!
 A few years ago I was getting lined up to image the Sun through my Helios 102mm refractor. I had used a piece of white card and my telescope’s finder scope to align myself correctly. The solar filter was safely in place on the front of the telescope, so I was capping the finder scope again when I got distracted and had only put the rear cap on. It took seconds for even that tiny magnification to burn a hole through the rear finder scope cover. I was very lucky that my face or eye hadn’t got near that finder scope during that time or else I would have been burned or even blinded. So please follow all safety procedures carefully.
Observing The Sun in White Light
If you have a telescope or binoculars, you can safely observe the Sun with nothing more technical than a piece of white card. I tested this method with my own first telescope when I was 11 years old. Using the projection method it is possible to view sunspots, and this is also a great way of observing a solar eclipse or planet transiting across the solar disc. Please note: if you have a medium/large reflecting telescope, this method is unsuitable as it can generate too much heat.
If you have a telescope or binoculars, you can safely observe the Sun with nothing more technical than a piece of white card. I tested this method with my own first telescope when I was 11 years old. Using the projection method it is possible to view sunspots, and this is also a great way of observing a solar eclipse or planet transiting across the solar disc. Please note: if you have a medium/large reflecting telescope, this method is unsuitable as it can generate too much heat.
Images of the August ’99 partial eclipse, viewed using the projection method.
Photos by Mark McIntyre

 If you want to observe the Sun with your telescope or binoculars, you can do so by making a solar filter using Baader Astro Solar Film which you can buy for around £20 for an A4 sheet. Before making or buying any solar filter, please check with your telescope manufacturer that your particular telescope is safe to use in this way. There are lots of guidelines online which can show you the best design of solar filter for your telescope. Make sure that you follow all instructions, and handle the film with care so that you don’t damage it. Also ensure that the filter makes a snug fit on the front of your telescope so that it cannot blow off during an observing session, otherwise you risk damaging your eyes. The picture above left shows the home-made Baader filter I use on my Helios 102mm refractor. We used the end cap of the telescope as a housing to ensure that the film remains mostly covered in rigid plastic. If I hadn’t been able to do this I would have made sure that I had a hard container to keep it in when not in use to prevent it from becoming damaged. Baader AstroSolar Safety Film blocks out the majority of the light from the photosphere and allows the observation of sunspots and limb darkening. Visually the image looks grey in colour, but when people take photographs with AstroSolar Film, they sometimes artificially add colour back in again using image processing in Photoshop. The photo below is a filter that we bought for use on our 8” Ritchie-Chretien telescope. It is made from the same solar film but it has a rigid housing and locking nuts to keep the filter safely in place.

It is possible to convert an existing refractor telescope to be a fully functional H-alpha or Calcium-K telescope. You do this using special filter modules which are similar to the Herschel Wedge mentioned above, except the filter is specific to CaK or H-alpha wavelengths. Lunt solar systems sell these products and the Calcium K image I showed earlier was taken by Pete Williamson with a 102mm refractor and Lunt 1200 Calcium K module. Another very popular product on the market is the Daystar Quark Chromosphere. The advantage of these modules is that they are very versatile as they can be fitted onto the back of any telescope. Although not cheap, they are a more affordable way of imaging with a larger aperture compared to buying the large specialist H-alpha solar telescopes which can cost many thousands of pounds.
Solar prominence and active region imaged by Wendy Clark with a Daystar Quark Chromosphere attached to a 120mm ED refractor, imaged with a PGR Flea Mono camera

Dedicated solar scopes have a much more complex design. Each type of solar telescope will have slightly different internal components which are arranged in slightly different configurations, but there are a number of optics which are common to most. First of all is an energy rejection filter. This cuts out all the unwanted heat and damaging UV radiation. Next is the important component which is at the heart of every solar scope; an etalon. In simple terms, an etalon is made of 2 highly reflective plates which are mounted very close together, and light bounces back and forth between the 2 plates. This is the component that ensures you are only viewing light of the correct wavelength, whether that be 656.3nm for H-alpha or 393.3nm for calcium-K. In some solar telescopes it is possible to adjust the etalon and view light at wavelengths on either side of the H-alpha line; this slightly changes which part of the Sun’s atmosphere you are looking at. In the Coronado PST model which we have, it is possible to view the photosphere and see sunspots at one end, and then as you alter the wavelength you effectively zoom out into the chromosphere, and then the plages and prominences become visible. Some higher end solar telescopes have 2 etalons in them, and this is commonly referred to as a double-stack. In this case, the 2 etalons are tuned to slightly different frequencies, and this causes the transmission curves to overlap. This makes the image slightly dimmer, but has the advantage of giving you a sharper resolution. Placed either before or after the etalon, depending in the design, will be an objective lens (if this is placed before the etalon there will also be a re-converging lens after the etalon) and finally a trim filter. There are several dedicated solar telescopes on the market, the most popular being made by Lunt and Coronado. Because the Sun is so bright, you don’t need a particularly large aperture telescope to see the main features. But as with most telescopes, you will get more impressive results if you go for a larger aperture. The Calcium-K telescopes tend to be larger aperture than the entry level H-alpha telescopes. Interestingly, when viewing in Calcium K it can be difficult to see the features visually, but your camera will pick up stunning detail.
Coronado Personal Solar Telescope (PST) which has aperture of 40mm

Recording your Observations
Because the Sun is never exactly the same each day, it is a really fun target for astronomy sketching. There have been times when I’ve felt I can do more justice to what I’m seeing through the Coronado PST with my coloured pastel pencils than I can with a camera! Astronomy sketching of any object certainly makes you look more closely at it and study it more carefully. Because the Sun will never look exactly like this again, it’s very rewarding to record what you’re seeing. The images below show some of the sketches I’ve done in pencil on white paper and in coloured pastels on black paper.
Pencil sketches of the Sun by Mary McIntyre

Coloured sketches of the Sun in H-alpha by Mary McIntyre

Imaging the Sun
I would like to say here that I am by no means an expert at solar astrophotography. However, I can help you to get started by sharing with you the methods that have worked for me and that helped me to get the best out of my equipment over the past 8 years.

It may surprise you to learn that you do not need a telescope in order to photograph the Sun. You can make a home-made solar filter which fits over the front of a bridge camera lens or a DSLR zoom lens. They are relatively inexpensive to make using the same Baader AstroSolar Film that you can use to make a telescope filter. The image above shows the homemade solar filters we made to image the total solar eclipse in 2017. The image below that is a full disc Sun image taken by Dr. Steve Wainwright using a bridge camera and homemade solar filter. The detail on the sunspot region is incredible, especially considering the fact that no telescope was used.
Sun in White Light imaged by Dr. Steve Wainwright using a bridge camera

This involves the use of a T-ring and extension tube to connect your telescope directly to the DSLR camera without the use of a camera lens or a telescope eye piece. It takes practice, but if you use the live view function on the camera, you can zoom in on any sunspots that are present and focus your camera on them. Then you can experiment to get the best exposure for your telescope. If your telescope is on a static mount, then make sure you keep the exposure times really short to prevent motion blur, because the Sun moves very quickly when you have a telescope pointing at it! Once you get a bit of practice at taking single shots, you can then start to experiment with image stacking. This is involves taking lots of identical images of the Sun then using computer software such as Autostakkert!2 and Registax 6 to essentially layer those images on top of each other. The result of stacking is that you achieve a much sharper and more detailed image that you can achieve with a single shot. Make sure that you have your camera set to “RAW” because jpegs are very compressed and are much lower in resolution. The images below show the Sun taken with a 70mm William Optics refractor with the Thousand Oaks solar filter. The first image is a single shot, the second image is the result of stacking 57 of those identical images. The result is more detailed with much better definition around the sunspots, plus faculae and granulation are visible in the stacked image.
The effect of stacking images of the Sun in white light.
Photos by Mary McIntyre


Getting a decent image with a DSLR through our Coronada PST has taken me years of practice and I have had so many frustrating hours trying to perfect my techniques. The first challenge is getting the camera to focus because with our usual imaging assembly, there isn’t enough in-focus. The way we’ve overcome this is to buy a very low profile T-ring which is only 1mm thick rather than the usual 10mm. Then we use a short nose piece which is threaded and takes a 2x Barlow. Together that assembly gets enough in-focus and allows the DSLR to reach sharp focus. The imaging assembly we use is shown in the image below.
Coronado PST and DSLR imaging assembly

Sun in H-alpha by Mary McIntyre – taken using the eyepiece projection method

Because it’s a H-alpha telescope, it is very rich in red light. This causes a loss of detail because the camera is just overwhelmed with colour. The way I’ve found I got the best results is to set my camera to monochrome. Then when you use the live view screen for focusing, you will more easily be able to focus on the plages and active regions. If necessary you can retune the etalon to give you the best amount of contrast around the active regions. Once you’re focused, just run off a series of identical shots. If you are shooting in RAW the images will still be in colour when you import them (any settings applied on the camera are just jpeg artefacts; the RAW image is the raw data without any camera settings applied so they will still be colour) but you can quickly remove the colour again using an image processing software that is capable of batch editing. I use Lightroom to desaturate the images and crop them, before exporting them as TIFF files. I then use the TIFFs for image stacking. As with white light images, a stacked image will contain more detail than a single shot. The stacked image will be in mono, but I will sometimes then use Photoshop to artificially add colour back into the image, using a colour which is more pleasing to the eye than the vivid pink that was originally there. If there are prominences visible, I usually duplicate the stacked image, then process one to bring out surface features and the other to enhance the prominences. I then merge the two images back together using a layer mask in Photoshop. The image collage below shows a single H-alpha shot on the left and on the right is the resulting stacked and re-coloured image. Below that are a couple of photos of prominences taken with the PST and DSLR camera.
Sun in H-alpha by Mary McIntyre

Prominences by Mary McIntyre
Sun in H-alpha by Mary McIntyre – in mono and with colour added

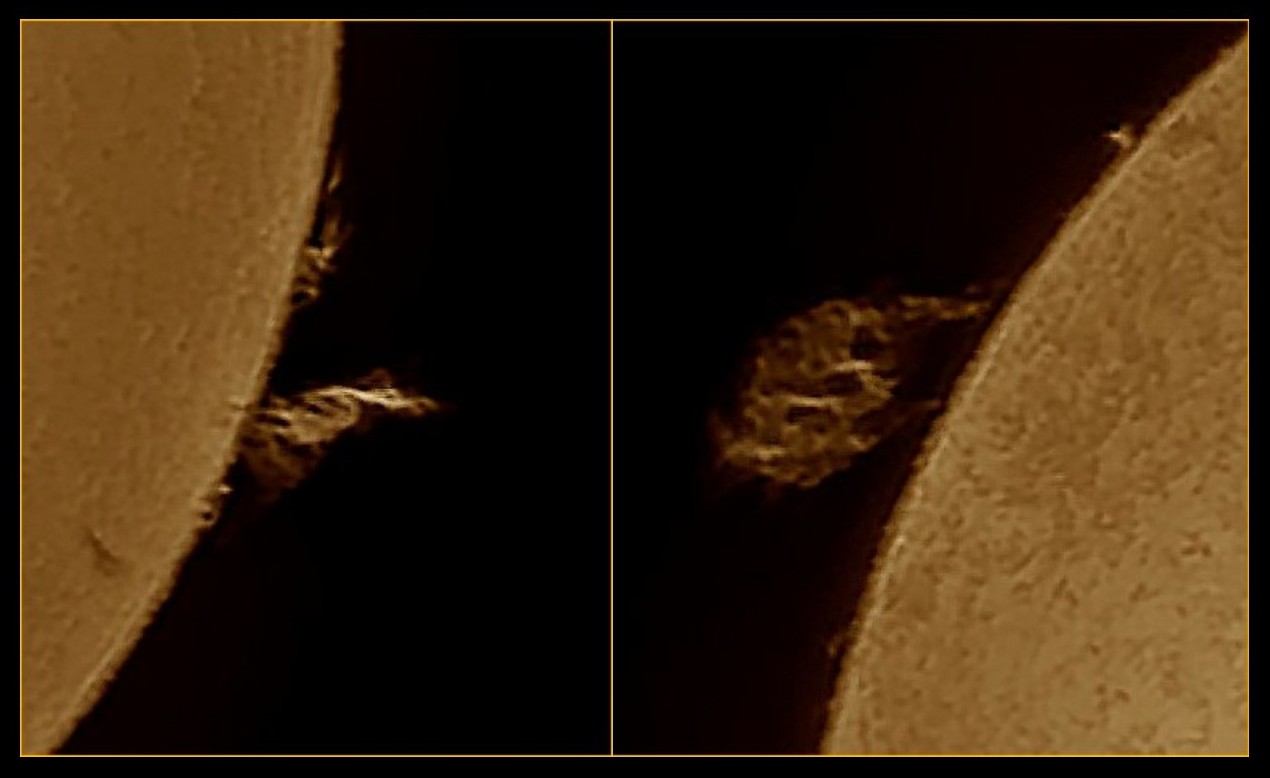
If you have a larger telescope, you will get much more detail in your images. The images below were taken by Pete Williamson. The left side image was taken with a 102mm refractor and Baader Herschel Wedge and the right side image was the same active region taken with a Coronado Solarmax II 90mm aperture H-alpha telescope. Both images were taken with an ASI174MM camera. Below that are two more images from Wendy Clark, taken with a 120ED refractor, Daystar Quark Chromosphere and Point Grey Grasshopper camera.
Sun in white light and H-alpha by Pete Williamson

Sun in H-alpha using a Daystar Quark - by Wendy Clark

The most important thing when solar observing is to stay safe. If your equipment develops a fault, never try to repair it yourself. Check your solar filters before every use and if you are in any doubt about possible damage, throw it away and buy or make a new one. It really isn’t worth the risk to your eye sight or damage to your camera equipment. As long as you have the correct equipment, solar observing is a very rewarding pastime. Studying something so dynamic compared to most other astronomical objects is extremely fun and educational. And the added bonus is that you don’t get nearly as cold as you do when observing at night!
A really good article and video blog all about solar observing, photography and image processing is available from the Astronomy Now website at this address:
https://www.astronomynow.com/mag/1007/TheSun.html
Dr. Steve Wainwright has written a book on how to do solar imaging with modest equipment. It's just £2.99 on Amazon - more info here:
https://www.amazon.co.uk/Observing-Imaging-Sun-Modest-Equipment-ebook
If you want to learn more about the Sun and how to get the best out of your solar photography, there is a great short course that you can download from:
https://www.astronomyknowhow.com/solar-imaging for the great price of just £35
More information about how solar filters work can be found here:
https://thesolarexplorer.net/index.php?option=com_weblinks&view=category&id=14%3Ahowsolarfilterswork&Itemid=6
Thanks to Pete Williamson, Steve Wainwright, Wendy Clark and
Mark McIntyre for their kind permission to use their images
alongside my own.
Mark McIntyre for their kind permission to use their images
alongside my own.